Review of the Blichmann Tower of Power
Once in awhile, a product hits the homebrew market that redefines the way we make beer at home. Blichmann Engineering is always on the leading edge of innovation, and they’ve definitely hit the mark with their latest release, which is why we were thrilled when Blichmann offered to let us test the Tower of Power. Over the past few months, we’ve had the opportunity to integrate the Tower of Power into our brewing system, and have brewed with it several times. In this post we’ll focus on the various levels of functionality that it offers and give you our own review as to whether it stacks up to the claims that it really can bridge the gap between homebrewers and the pros. After reading and if you’re interested in picking one up, head over to our Blichmann Tower of Power product page.
UPDATE: After reading this review, check out our “Brewing with the Blichmann Tower of Power” post, which includes a video of me using the Tower of Power during one of our brew days.
What is It?
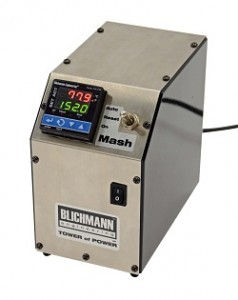
For those of you who haven’t heard of the Tower of Power (ToP from here on out) yet, it’s a highly modular gas fired RIMS, controlled by one or more PID controllers.
In English, please?
RIMS stands for Recirculation Infusion Mash System, which simply means that during mashing, the wort is continuously recirculated and heat is applied directly to the mash tun.
In the case of the ToP, the primary component or “brains” of the setup called the Control Module, monitors the temperature of the mash, and then if adjustments are needed it will open the gas solenoid (included with each control module) allowing gas to flow through the burner, and automatically apply a spark to ignite it. Once the temperature goal has been reached, the burner will again shut off.
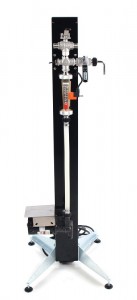
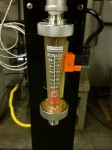
In addition to the Control Modules, Blichmann also offers a Pump Tower, with or without a March 815 high temperature pump. The Pump Tower has a flow meter to help set your mash recirculation and lautering rate, complete with adjustable alarm that will sound if the flow drops below a set rate, indicating a stuck sparge may be imminent, and giving you time to correct.
As if PID controllers accurately controlling your mash temperature and flow meters to set your recirculation and lautering rates aren’t enough, advanced users can download the Top Link software from Blichmann’s website, and with an optional communications cable set up automatic ramp and mash profiles. Look to a future post for a more detailed review of the Top Link software.
The beauty of the Tower of Power is it’s ability to accurately and repeatedly reach and maintain mash temperatures, as well as easily perform step mashes and mash outs.
Our Setup
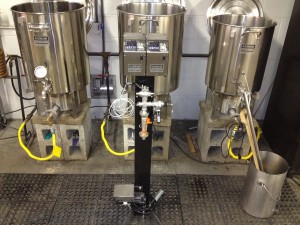
At Great Fermentations, our brewery is set up as a single tier, three vessel system, with a 20 gallon Blichmann Boilermaker pot as our hot liquor tank (HLT), and 30 gallon Boilermakers for our mash tun and boil kettle, allowing us to make 20 gallons of delicious, finished beer (gotta feed the keggerator!). Since we have a single tier system and like to fly sparge, we have two pumps, a water pump that’s used to move water from the hot liquor tank to the mash tun during the sparge, and the March 815 mounted to the Pump Tower, used to transfer wort to the boil kettle and later through the Chillzilla counterflow chiller. We have two Control Modules mounted to the Pump Tower (requires an optional bracket), one controlling our mash, the other our HLT temperature.
We also recently upgraded to three Blichmann floor standing burners with natural gas conversions, and I’ve gotta say, they blow our old burners out of the water. They’re quiet, they’re hot, and the needle valves that come with the natural gas conversion are sweet. The first time I brewed on them, I cut about 45 minutes off of my brew day when compared to our old clunker burners, which absolutely blew me away.
Setup was pretty straight forward. If you’re not familiar with Blichmann’s instructions, for some reason they read like a couple of engineers put them together. While referencing the manual, I was able to put together the whole ToP system in about 2 hours, not including the time (and two store runs) it took me to switch around our gas plumbing to work with the new burners.
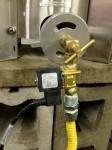
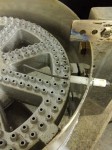
The vast majority of propane burners should hook right up; just unscrew the hose from the orifice fitting, install the gas solenoid inline with the flow arrow going the right direction, then reinstall the hose. If you have a newer Blichmann burner there are two mounting holes for the ignition electrodes, and they simply bolt on. If not you’ll have to drill a two mounting hole in your burner before installing the electrode, and Blichmann provides instructions on how to do so. Adjusting the electrode wire is similar to adjusting a spark plug gap, but a whole lot quicker. Bend it at a 90° angle so that the electrode is directly over one of the holes in the burner, then set the gap to the correct amount. Again, Blichmann provides good detailed instructions, and as always, the staff of Great Fermentations is available to help if you have questions.
Since we had a March 815 already, we opted for the Pump Tower sans pump, and added ours on. Cut the plug off the March pump, then use the included wire nuts to wire it to the Pump Tower and mount the pump with the included bracket, allowing you to control the pump through the Pump Tower.
Brewing Impressions
Let’s be real here. If you’ve never brewed on a system that uses PIDs or uses pumps, there’s going to be a learning curve, though in all honesty if you take it slow, think things through, and read that operating manual you shouldn’t have any issues. There’s going to be a relearning period whenever you change major components of your brewing system, and the ToP is no exception. Blichmann also suggests to do a “test run” just using water to get the hang of the controls, and it probably is a really good idea; we just plowed ahead though and crossed our fingers during the first use!
My impressions are universally positive. The combination of very accurate temperature sensors and PID controllers makes the ToP a joy to use. Once I have water in my HLT and mash tun, I set the HLT Control Module to mashout temperature (typically 170° F) and switch it to automatic mode, then forget about it until I’m ready to sparge. There’s no need to recirculate the HLT, and it’s fine to just mount the temperature probe into the kettle.
I know that I lose about ten degrees on my system when I dough in, so I go ahead and set my strike temperature to ten degrees higher than my target mash temperature on the mash Control Module. Since it’s almost impossible to get an accurate mash temperature with the probe mounted into the mash tun, the probe is either mounted inline in the Pump Tower or in a “T” fitting coming off the pump. Because of this, the mash pump needs to be recirculating to get an accurate reading, even before you dough in. Once the strike water comes up to temperature, shut off the pump, and put the mash controller into standby mode.
Dough in as usual, then give the mash about ten minutes to absorb water before starting to circulate the mash and turning the burner back into automatic mode. This will give the grain bed time to set, and greatly decrease the chance of a stuck mash.
Speaking of stuck mashes, with any recirculating system using some rice hulls is good, inexpensive insurance. I can tell you from personal experience that 1 lb of rice hulls isn’t enough for a 20 gallon batch with around 15% sticky adjuncts. For most recipes I’d use about ½ lb per 5 gallons, more so on beers with a high percent of wheat, rye, or oats.
Stepped mashes are as simple as dialing the Control Module up using the arrow keys and hitting enter. The burner will fire until the mash hits the specified temp. It’s almost completely hands off. Beer geeks rejoice, that 17 step mash schedule you’ve always dreamed of is now very, very doable.
When I first read that the Pump Tower had a flow meter with low flow alarm, I thought that it was a cool idea, but honestly kinda gimmicky. After brewing with it a couple times though, it’s become one of my favorite features. When I brew, I typically am doing about eight things at once. During the mash I can get 20 gallons of beer out of our conical fermenter and get it cleaned up if I’m having a good day. I set the alarm to sound if flow decreases by about 25%, and go on with cleaning or getting ready for the next stage of brewing. If the alarm sounds (which it did on a recent brew day), I have enough time to get back over and fix the issue before it becomes a real problem. The flow meter also lets you repeatedly control lauter rate. I run off ½ gallon per minute on our system, which adds one more control point to your brew day. It really is a neat system.
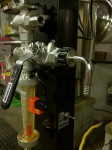
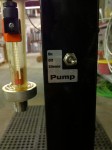
The Pump Tower also has a sample port which allows you to easily grab hydrometer or refractometer measurements, or nab a sample to do a starch conversion test. It also lets you easily bleed air out of the lines when you start the March pump since they’re not self priming. The pump itself is controlled via a three way switch. The topmost position is on, and the alarm (for the flow meter) is active. The middle position is off, and the bottom position turns the pump on, but silences the alarm, in case you lauter at a trickle.
There’s a pretty slick three way valve on the Pump Tower as well. In the center position the flow is off. If you move the handle to the right, it will gradually increase flow to the hose on that side, which on our system goes back into the mash tun. When you move the valve to the left, it reroutes to the left hand hose, which on our system is in the boil kettle. Makes lautering easy, and there’s even an adjustable stop so you (or drunken friends) don’t open the wrong valve.
I use the Tower pump to chill as well. During the boil I’ll run hot PBW, water, then Starsan through the pump, tower, and chiller, then drain from the boil kettle and flow back through the Pump Tower and through our Chillzilla, into either carboys or our conical. It works well, and is easy to set up.
Clean Up
Clean up of the ToP system is no more complicated than cleaning up any multi-vessel system with pumps. I give the HLT a quick wipe out before declaring it good, and since I only run water through the pump I sparge with I just make sure it doesn’t have any standing water in it before putting it away. During the boil I get the mash tun emptied, rinse off the Blichmann false bottom, then hit the inside with a white scrubbie. It’s surprisingly quick, even with 70 lbs of grain.
Once the mash tun is clean, I start PBW recirculating through the Pump Tower, all associated hoses, and through my counterflow system in a simple closed loop with a bucket. After PBW I circulate hot water, followed by StarSan. At each step I’ll make sure to run the liquid through both sides of the three way ball valve on the Pump Tower.
If you’re not using the Pump Tower to chill through a counterflow or plate chiller, there’s no reason to sanitize it, PBW and rinse water are plenty. Unfortunately at the time of this review the Tower of Power doesn’t include a feature to help with the cleaning of your boil kettle. For those of you with children, we at Great Fermentations suggest bribery.
Closing Remarks
The Tower of Power has many benefits, but the biggest in my mind is the ability to accurately re-brew recipes. This ability makes it much easier to tweak subsequent batches with small changes to the recipe (such as feedback from competition judges) and know that your tweak was the only change during the brewing process.
The ability to perform step mashes opens up a whole new range of options for the advanced brewer, letting you take full advantage of the various grains available, as well as customize your wort production to suit your tastes, goals, and specific style guidelines.
If you’re looking for an out of the box RIMS system that is modular enough to be adaptable to nearly any existing all grain system, there’s no better option than Blichmann Engineering’s Tower of Power. As I said in the beginning, the system is modular and here at Great Fermentations you can purchase it one piece at a time to fit it into your brewing setup at your own pace. Check out our Blichmann Tower of Power product page if you’re interested in picking one up.
Look to our blog for more upcoming posts about the Tower of Power and leave a comment if you have any questions that we didn’t cover; we’d be glad to answer!


Hi guys, you should upload a video with the cleaning phase
If you buy a gas ToP is there a conversion kit to make it for electric brewing later?
Stephen –
Unfortunately, no. You’d have to buy an all new ToP Control Module when switching to electric.
Thanks!
Bryan